Topic
How to Add Watermarks in A Word Editor: Simple Step-by-Step Guide
Why use a watermark in WPS Writer?
Branding
Confidentiality
Copyright protection
Professional look
H2: Step-by-step guide to adding watermarks in WPS Writer
Method 1: Adding a text watermark
Step 1: Open document and access the watermark menu
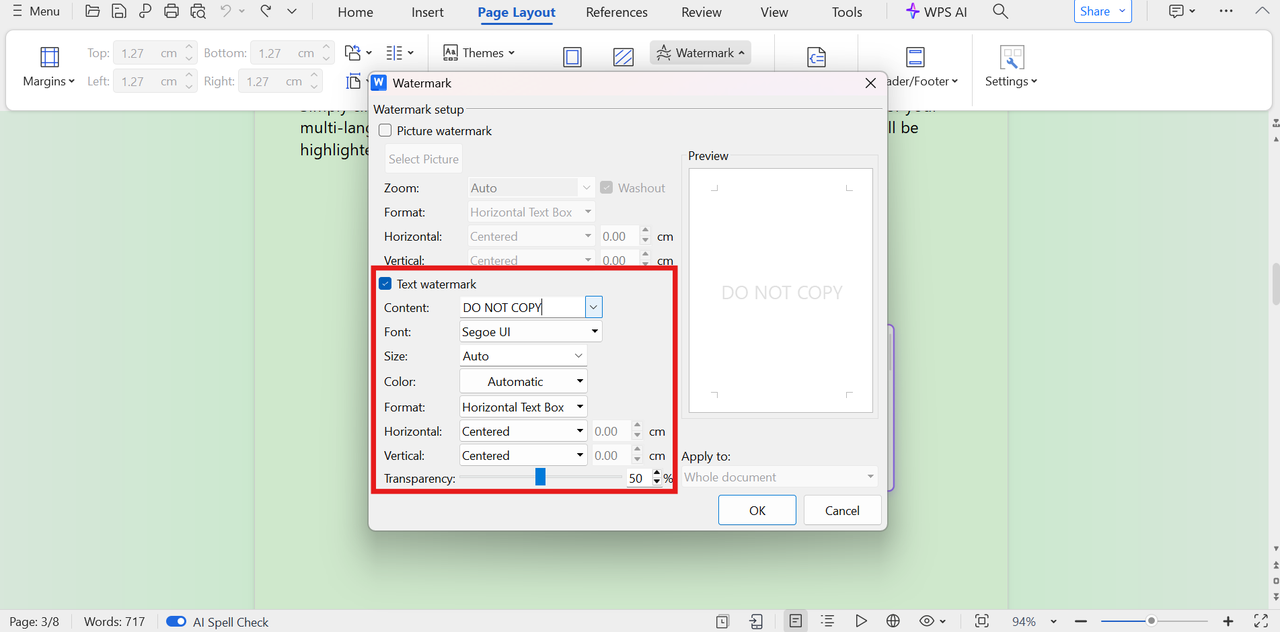
Step 2: Define your text watermark


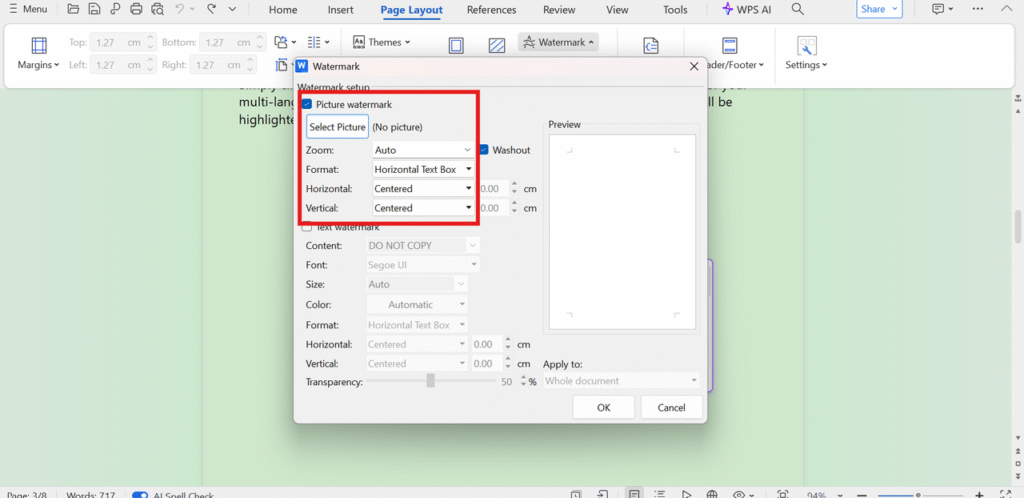
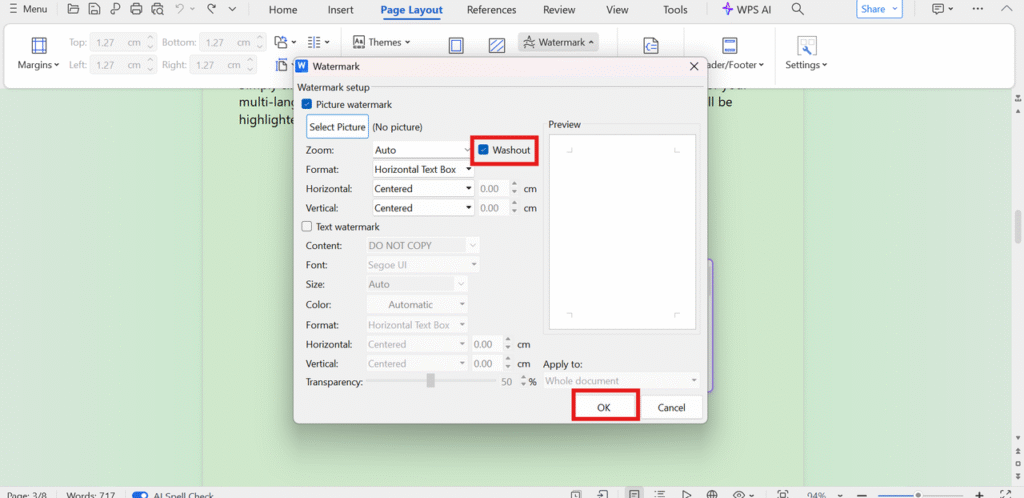
Method 2: Adding a picture watermark

Method 3: Adding built-in text watermarks


H2: Tips for effective watermarking
- Keep it subtle: Ensure that your watermark is not too bold or intrusive. A subtle watermark will indicate ownership or confidentiality without overwhelming the content, making sure the document remains readable.
- Use proper placement: Place the watermark in a way that doesn’t cover key content. Common placements include the center or diagonally across the page, where it’s visible but doesn’t obstruct text or images.
- Adjust transparency and size: Fine-tune the opacity and size of your watermark to make it discreet yet effective. For sensitive documents, use a faint watermark, and for branding, a slightly more prominent one may be appropriate.
- Choose simple and clear designs: Avoid complex logos or messages. A clean, simple design, whether it’s text like “Confidential” or your company logo, will ensure the watermark is professional and non-distracting.
- Test before finalizing: Always preview your document after adding a watermark. Check it on different devices or print a test copy to ensure the watermark looks good and doesn’t interfere with the document’s readability.
Let’s conclude

In today’s fast-evolving financial landscape, understanding sophisticated investment frameworks like the master equity plan is essential for investors, business owners, and financial strategists alike. This comprehensive guide delves into everything you need to know about the master equity plan, explaining its purpose, benefits, and practical applications. Throughout this article, the term master equity plan will be used strategically and supported by related concepts to ensure maximum clarity and SEO impact.
What is a Master Equity Plan?
A master equity plan is a structured, strategic framework designed to allocate, manage, and optimize equity ownership within a company or investment portfolio. It typically outlines how equity shares, stock options, and other forms of ownership interest are distributed among stakeholders, including founders, employees, investors, and partners. The goal is to maximize company growth, align incentives, and streamline equity-related transactions.
Industry experts often emphasize that an effective master equity plan acts as the backbone for equity management in startups and established companies. It ensures transparency, compliance, and fairness while providing flexibility to adapt to changing business needs.
The Importance of a Master Equity Plan in Modern Businesses
Implementing a master equity plan offers numerous advantages that can significantly influence a company’s growth trajectory:
- Alignment of Interests: By clearly defining equity distribution, the plan ensures all stakeholders are motivated towards common business goals.
- Attraction and Retention of Talent: Equity incentives serve as powerful tools to attract high-caliber talent and encourage long-term commitment.
- Investor Confidence: Transparent equity structures boost investor trust, facilitating easier capital raises.
- Legal and Tax Efficiency: A well-crafted plan helps companies comply with regulatory requirements and optimize tax implications related to equity compensation.
According to leading venture capitalists, “A robust equity plan is often the difference between a company’s success and failure, especially in competitive markets.”
Core Components of a Master Equity Plan
A typical master equity plan comprises several key components that work in unison:
1. Equity Allocation and Types
Equity can come in many forms, including common stock, preferred shares, restricted stock units (RSUs), and stock options. The plan specifies who receives what type and quantity of equity, ensuring clear ownership stakes.
2. Vesting Schedules
Vesting provisions define the timeline over which equity ownership is earned. This prevents early departures from undermining the equity structure and incentivizes long-term involvement.
3. Exercise and Transfer Rights
The plan details how and when equity holders can exercise options or transfer shares. Restrictions on transferability protect the company’s ownership integrity.
4. Valuation and Pricing
It includes methods for valuing shares during issuance or buyback events, critical for fair and transparent equity management.
5. Governance and Decision-Making
The framework establishes who has voting rights, control over equity-related decisions, and dispute resolution mechanisms.
How a Master Equity Plan Works: Step-by-Step Process
Understanding the execution of a master equity plan helps clarify its practical value:
- Design Phase: Stakeholders analyze business goals, equity types, and distribution strategies.
- Drafting Documentation: Legal and financial experts draft formal plan documents, incorporating vesting schedules and transfer rules.
- Approval and Adoption: The company’s board and shareholders approve the plan.
- Implementation: Equity is granted according to the plan; tracking and management systems are established.
- Ongoing Administration: Regular reviews and updates keep the plan aligned with evolving business needs.
Benefits of a Master Equity Plan
Enhancing Capital Efficiency
The master equity plan allows businesses to allocate equity strategically rather than relying solely on cash compensation. This capital-efficient approach frees up funds for other growth initiatives.
Boosting Employee Engagement and Loyalty
Equity ownership ties employees directly to the company’s success. When employees feel like owners, their productivity and loyalty typically increase.
Facilitating Fundraising and Partnerships
Clear equity frameworks simplify negotiations with investors and partners, expediting deal closures and minimizing conflicts.
Supporting Long-Term Business Planning
By clearly mapping out equity ownership and future issuance plans, companies can better plan for growth milestones, acquisitions, or exit events.
Master Equity Plan vs. Other Equity Management Approaches
| Feature | Master Equity Plan | Ad Hoc Equity Distribution | Employee Stock Option Plan (ESOP) | Profit Sharing Plans |
|---|---|---|---|---|
| Cost | Moderate, with initial setup and administration | Low setup cost but high management effort | Varies; often higher due to complex compliance | Low, mainly profit allocation costs |
| Efficiency | High efficiency with structured governance | Low; prone to errors and disputes | Moderate; focused on employees only | Moderate; depends on profit variability |
| Ease of Use | Requires expert design, but scalable | Simple but inefficient for large entities | Requires administration but widely used | Simple, but less strategic equity alignment |
| Flexibility | Highly customizable | Very inflexible | Moderate; constrained by plan rules | Limited; based on profitability |
| Legal and Tax Compliance | High, with expert guidance | Low, risky for compliance | High, regulated by tax authorities | Moderate, varies by jurisdiction |
Best Practices for Creating a Master Equity Plan
Industry leaders recommend the following for building an effective plan:
- Engage Financial and Legal Experts: Their expertise ensures compliance and strategic alignment.
- Customize to Company Needs: Avoid one-size-fits-all approaches; tailor the plan to your business stage and goals.
- Communicate Clearly: Transparency with stakeholders fosters trust and reduces conflicts.
- Review Periodically: Update the plan as your company grows or market conditions change.
- Incorporate Flexibility: Prepare for future fundraising rounds, hires, or structural changes.
Common Challenges in Managing Master Equity Plans
While the benefits are clear, companies often face hurdles:
- Complexity of Equity Valuation: Determining fair value requires expertise.
- Balancing Stakeholder Interests: Conflicting priorities among founders, employees, and investors can complicate equity allocation.
- Regulatory Compliance: Constantly evolving laws necessitate vigilant oversight.
- Administrative Burden: Managing grants, vesting, and transfers requires robust systems.
Effective planning and technology adoption can help overcome these challenges.
Real-World Applications of Master Equity Plans
Startups
Startups heavily rely on master equity plans to attract talent and incentivize founders and early investors. The plan often includes stock options with vesting to retain key players.
Established Companies
Mature companies use master equity plans to manage complex ownership structures, facilitate employee share purchase programs, and prepare for IPOs or acquisitions.
Investment Funds
Private equity and venture capital firms adopt master equity plans to align interests across portfolio companies, ensuring efficient capital deployment and returns.
Industry Expert Insights
Jessica Tran, a noted corporate finance strategist, states:
“A master equity plan is not just a legal document—it’s a strategic tool that shapes a company’s culture, capital structure, and future growth. When done right, it becomes a competitive advantage.”
This sentiment reflects why many top-performing companies prioritize equity plan optimization.
Tools and Technologies Supporting Master Equity Plans
Modern software solutions simplify master equity plan administration. Features include:
- Automated tracking of equity grants and vesting
- Real-time valuation updates
- Compliance management and reporting
- Secure shareholder communication portals
Investing in the right technology boosts accuracy and reduces operational risks.
Master Equity Plan: Cost Considerations
The cost of implementing a master equity plan varies based on company size, complexity, and the professionals involved. Typical expenses include:
- Legal and consulting fees for plan design
- Software or platform subscriptions for administration
- Ongoing compliance and audit costs
Despite upfront costs, the strategic benefits and avoided risks typically justify the investment.
The Future of Master Equity Plans
With growing emphasis on employee ownership, transparency, and innovative financing, master equity plans will continue evolving. Trends include:
- Integration with blockchain for share tracking
- Increased focus on ESG (Environmental, Social, Governance) metrics in equity plans
- Enhanced analytics to measure equity plan impact on company performance
Staying ahead means embracing these innovations and continuously refining equity strategies.
Conclusion
The master equity plan stands as a pivotal element in modern corporate finance, enabling businesses to strategically allocate ownership, incentivize stakeholders, and drive sustainable growth. Whether you are a startup founder, investor, or corporate executive, understanding and implementing a well-designed master equity plan can unlock immense value and competitive advantage. Embracing best practices, leveraging technology, and maintaining flexibility will ensure your equity plan remains a powerful tool for years to come.
FAQ’s
What is the primary purpose of a master equity plan?
The primary purpose is to manage and optimize equity ownership within a company, aligning interests and facilitating growth.
How does a master equity plan benefit employees?
It provides equity incentives that promote loyalty, motivation, and long-term commitment.
Can a master equity plan be customized for different business stages?
Yes, the plan should be tailored to fit the company’s size, growth phase, and strategic goals.
What role does vesting play in a master equity plan?
Vesting schedules ensure equity is earned over time, encouraging stakeholders to remain involved.
How often should a master equity plan be reviewed?
It’s advisable to review the plan annually or whenever significant business changes occur.
Are there software tools available to manage master equity plans?
Yes, numerous platforms offer automated administration, compliance tracking, and shareholder communication features.

The Tartarian civilization has captivated historians, researchers, and enthusiasts worldwide due to its mysterious origins and extraordinary legacy. From enigmatic architecture to obscure historical references, the Tartarian phenomenon continues to spark debate and exploration. This article dives deep into the essence of Tartarian, exploring its historical context, cultural significance, and the many theories that surround it.
Understanding Tartarian: What Does the Term Mean?
The term Tartarian traditionally refers to the people and territories historically associated with Tartary — a vast region covering parts of Asia and Eastern Europe. In old maps and texts, Tartary represented an expansive land, often depicted vaguely due to limited knowledge of the area by Western cartographers.
Modern interest in the Tartarian civilization goes beyond mere geography. Enthusiasts believe Tartarian culture to be a lost or suppressed ancient civilization known for advanced technology, architecture, and global influence. This modern interpretation ignites both curiosity and skepticism among scholars and the general public alike.
The Historical Context of Tartarian Civilization
Origins and Geography
Historically, Tartary was a broad term used in medieval and early modern Europe to describe the largely unexplored territories in Central and Northern Asia. The Tartarian people included various nomadic tribes, such as the Mongols and Turkic groups, known for their vast empires and cultural diversity.
Historical Accounts and Descriptions
European explorers and cartographers often described Tartary with a blend of fact and myth. Some accounts depict Tartarian societies as nomadic warriors; others emphasize their sophisticated cities and monumental architecture, albeit these descriptions remain sparse and sometimes contradictory.
Architectural Marvels: The Legacy of Tartarian Structures
One of the most compelling features linked to Tartarian civilization is its purported architectural achievements. Proponents of the Tartarian theory suggest that many grand structures around the world — from massive stone buildings to intricately designed monuments — may be remnants of this ancient culture.
Characteristics of Tartarian Architecture
- Use of large stone blocks with precise fitting
- Massive domes and spires
- Ornate and symbolic decorations
- Complex engineering techniques that defy the technology of their time
The Mystery of Lost Technologies
Experts note that some architectural techniques associated with Tartarian buildings appear advanced for their historical era. These findings fuel theories about lost technologies or suppressed histories that could rewrite our understanding of ancient civilizations.
Theories Surrounding the Tartarian Civilization
The Lost Civilization Hypothesis
One prevalent theory proposes that Tartarian was an advanced global civilization, predating known ancient cultures. According to this view, Tartarians possessed technologies and knowledge that rival or surpass those of modern times but were subsequently erased from mainstream history.
The Suppression Theory
Some researchers argue that Tartarian history and achievements have been deliberately obscured or erased through historical revisionism. This theory often cites destroyed buildings, altered maps, and censored records as evidence of a grand cover-up.
Skeptical Views
Mainstream historians caution against overestimating Tartarian claims, pointing out that much of the evidence is anecdotal or speculative. They emphasize the importance of rigorous archaeological and historical methods before drawing conclusions.
Comparing Tartarian Civilization to Known Ancient Cultures
To better understand Tartarian, let’s compare it with other well-documented ancient civilizations such as Mesopotamia, Egypt, the Indus Valley, and the Roman Empire.
| Feature | Tartarian | Mesopotamia | Ancient Egypt | Indus Valley | Roman Empire |
|---|---|---|---|---|---|
| Known Historical Era | Ambiguous, debated | 3500–539 BCE | 3100–30 BCE | 3300–1300 BCE | 27 BCE–476 CE |
| Architecture | Monumental, mysterious structures | Ziggurats, temples | Pyramids, temples | Urban planning, granaries | Aqueducts, amphitheaters |
| Technological Level | Allegedly advanced, debated | Early irrigation, writing | Advanced construction, hieroglyphics | Urban sanitation, crafts | Roads, engineering feats |
| Cultural Impact | Hypothetical global influence | Foundation of civilization | Religious and cultural icon | Early urban culture | Legal and military systems |
| Archaeological Evidence | Sparse and controversial | Extensive | Extensive | Extensive | Extensive |
Exploring Tartarian Influence in Modern Times
Architectural Remnants and Urban Legends
Many people today associate Tartarian remnants with mysterious buildings found worldwide, often dismissed as “mud floods” or alterations made to ancient sites. These ideas fuel urban legends and speculative documentaries that continue to engage a large audience.
Cultural and Popular Interest
Tartarian has emerged in popular culture, alternative history forums, and conspiracy theories. This trend reflects a broader human fascination with lost knowledge and the mysteries of the past.
Evaluating the Credibility of Tartarian Theories
Expert Opinions and Standards
Leading historians and archaeologists stress the importance of critical thinking when approaching Tartarian claims. As Dr. Jane Thornton, a renowned historian, notes, “Extraordinary claims require extraordinary evidence. Without concrete archaeological proof, Tartarian theories remain speculative.”
The Role of Evidence-Based Research
To establish credibility, theories must be backed by verifiable data, such as artifacts, documented history, and peer-reviewed studies. Until such evidence emerges, Tartarian remains an intriguing, yet unconfirmed, part of historical inquiry.
How Tartarian Research Can Impact Future Historical Studies
Studying Tartarian theories encourages historians to revisit unexplored or overlooked regions and artifacts. It highlights the importance of questioning established narratives and remaining open to new discoveries that could reshape our understanding of human history.
Conclusion:
The Tartarian civilization remains a topic shrouded in mystery, blending historical fact with speculative theory. Whether viewed as a misunderstood historical region or an ancient advanced society, Tartarian continues to inspire curiosity and research. As new evidence emerges and technology advances, our grasp of Tartarian’s true legacy may eventually come into sharper focus.
FAQ’s
What exactly is Tartarian civilization?
Tartarian refers to a historical region and a speculative ancient civilization believed by some to possess advanced technology and architecture.
Why is Tartarian considered mysterious?
Its mystery stems from limited historical records, enigmatic architecture, and theories about lost or suppressed knowledge.
Are Tartarian buildings real?
Many grand buildings are attributed to Tartarian origins by enthusiasts, though mainstream archaeology often disputes these claims.
What evidence supports Tartarian theories?
Evidence includes old maps, architectural features, and anecdotal accounts, but no definitive archaeological proof yet exists.
How does Tartarian compare to other ancient civilizations?
Unlike well-documented civilizations, Tartarian’s history and influence remain unclear and debated.
Can Tartarian theories change history?
If proven, Tartarian theories could significantly impact our understanding of ancient civilizations and technological development.

Owning land outright is one of humanity’s oldest dreams. The idea of holding property without taxes, rent, or interference from any higher authority sounds ideal — but is it even possible today? This is where the term “what is an allodial title” comes into play. Understanding it helps separate legal myth from reality, especially for anyone interested in how property ownership truly works.
Quick Answer
An allodial title means absolute ownership of land, free from obligations like taxes, rents, or services owed to any higher authority such as the government or monarchy. In modern times, true allodial ownership rarely exists, as most land is held under the authority of a state or crown.
Understanding the Concept of Allodial Title
To answer what is an allodial title, we must go back to its roots. The word “allodial” comes from the Old Norse term “óðal,” meaning inherited property or ancestral estate. Historically, an allodial title represented the highest form of land ownership — one where the owner owed nothing to anyone.
In early medieval Europe, land was either feudal (held under obligation to a lord) or allodial (owned outright). Those with allodial land were free from feudal duties, enjoying complete control over their property.
In contrast, most modern property systems — including in the United States, Canada, the UK, and Australia — operate under fee simple ownership, which grants strong rights but still subjects the property to government regulations, taxes, and eminent domain.
Allodial Title vs. Feudal Ownership
Understanding what is an allodial title is easier when compared with feudal or fee-simple systems.
| Feature | Allodial Title | Feudal/Fee-Simple Ownership |
|---|---|---|
| Ownership | Absolute; owner has total control | Conditional; held under government authority |
| Taxation | No property taxes or obligations | Subject to annual property taxes |
| Transfer of Land | Freely transferable without approval | Must follow state or government regulations |
| Authority Over Land | Sole authority of owner | Limited by zoning and public laws |
| Seizure Rights | Cannot be taken by any authority | Can be seized for unpaid taxes or eminent domain |
| Modern Existence | Rare or symbolic | Universal in modern legal systems |
This table clearly shows that while allodial ownership sounds appealing, fee-simple ownership is what most people actually hold — a strong but not absolute form of property rights.
Historical Origins of Allodial Title
When studying what is an allodial title, history provides context. In medieval Europe, allodial lands existed primarily in parts of Scandinavia, Switzerland, and Germany. These lands were typically inherited through family lines, symbolizing freedom from feudal obligations.
In England, after the Norman Conquest of 1066, William the Conqueror abolished most allodial holdings, converting them into feudal estates under his sovereignty. This shift influenced nearly all later property systems, including those in British colonies such as America.
The Concept in Modern U.S. Law
In the U.S., discussions about what is an allodial title often emerge among people who believe they can hold land completely free from government control. However, in practical legal terms, true allodial ownership does not exist for individuals in the United States.
According to modern property law:
“All land in the United States is subject to the sovereignty of the state and federal governments.”
— American Bar Association (Property Rights and Ownership, 2023)
Even though U.S. property ownership feels “absolute,” it operates under fee simple — which allows the government to collect property taxes, enforce zoning laws, and exercise eminent domain if needed.
A few states, like Nevada in the late 1990s, experimented with “allodial title programs” for homeowners. These programs allowed people to prepay property taxes for life, but the ownership still wasn’t truly allodial in the historic sense. The government still retained ultimate authority.
Global Context: Where Allodial Title Still Exists
While rare, some regions maintain versions of allodial title:
- Liechtenstein and Switzerland still recognize traditional allodial lands.
- In France, certain old family estates are technically allodial but remain subject to national law.
- In Micronesia and parts of American Samoa, community-held land follows traditional allodial principles.
However, in most modern countries, absolute ownership conflicts with public interest laws that regulate land use, environment, and taxation.
Why Allodial Title Matters
Understanding what is an allodial title matters for several reasons:
- It clarifies misconceptions. Many people mistakenly believe they can “buy” allodial titles today, often falling prey to scams or misinterpretations of sovereign citizen theories.
- It defines ownership limits. Knowing what you actually own — and what the government controls — helps prevent legal disputes.
- It reveals the evolution of property rights. From kings to constitutions, land ownership reflects how societies balance freedom and responsibility.
Legal Perspective: Can You Claim Allodial Title Today?
From a legal expert’s view, the short answer is no.
While the idea of an allodial title symbolizes independence, modern law doesn’t recognize it for private citizens.
According to The American Property Law Journal:
“Fee simple title represents the closest possible equivalent to allodial ownership in U.S. law.”
You can own your home, sell it, pass it to heirs, or improve it — but you still owe taxes and must follow laws. Refusing to pay taxes can lead to foreclosure, which proves that ultimate authority still rests with the state.
Myths and Misconceptions About Allodial Title
Many internet claims around what is an allodial title are misleading. Let’s debunk a few:
- Myth: You can file paperwork to make your land allodial.
- Fact: No government or legal body in the U.S. recognizes private allodial conversion.
- Myth: Allodial ownership means tax exemption.
- Fact: Even prepaid or trust-owned properties remain subject to jurisdictional authority.
- Myth: Sovereign citizens can claim land as allodial.
- Fact: Courts consistently reject these arguments as invalid.
Economic Impact of Allodial vs. Fee-Simple Ownership
Let’s compare allodial title and modern fee-simple title from an economic and practical standpoint.
| Factor | Allodial Title (Theoretical) | Fee-Simple Title (Modern Reality) |
|---|---|---|
| Cost | No ongoing taxes or fees | Subject to annual property taxes |
| Ease of Use | Total freedom, no restrictions | Regulated by local zoning and building codes |
| Accessibility | Extremely rare or historical only | Widely available for purchase |
| Security | Cannot be seized | Can be seized for taxes or public use |
| Investment Value | Limited resale market | Highly liquid in real estate markets |
This comparison highlights why fee-simple ownership dominates today — it offers practical stability, even if it isn’t absolute freedom.
Government Role in Land Ownership
Even in democratic societies, land ownership operates under government oversight. Property taxes fund schools, roads, and emergency services. Zoning ensures communities remain safe and organized. Thus, the state retains a form of higher title, even if ownership feels personal.
From the viewpoint of property law experts, governments act as custodians of land use rights — balancing individual freedom with collective welfare.
Cultural and Philosophical Meaning
Philosophically, what is an allodial title symbolizes ultimate independence — a person standing free from external control. For libertarians and certain sovereignty movements, it represents an ideal of personal autonomy.
However, in practice, society depends on shared rules that ensure fairness, safety, and environmental responsibility.
As the legal scholar John Locke once argued:
“Property derives its legitimacy not from isolation, but from its function within the social contract.”
Thus, true ownership involves both rights and duties.
EXPERT ANSWERS
1. Can you own land outright in the U.S.?
No. Even with fee-simple title, all land is still under the jurisdiction of state and federal governments. Owners must pay taxes and follow local regulations.
2. Is allodial title legal in the U.S.?
Not in the traditional sense. Some states use the term symbolically, but no state recognizes private allodial ownership free of taxes or eminent domain.
3. How does allodial title differ from fee-simple?
Allodial title implies complete independence from any authority, while fee-simple still acknowledges government power. Fee-simple is the practical modern equivalent.
4. Can a private citizen create an allodial title?
No. There is no legal process to convert private property into allodial ownership in modern jurisdictions.
5. Which countries still allow allodial title?
A few, like Switzerland and Liechtenstein, maintain historical allodial lands, but they operate under national laws, not absolute independence.
Real-World Example: Nevada’s Allodial Title Program
In the 1990s, Nevada introduced an allodial title program allowing homeowners to pay a lump sum equivalent to future property taxes. The state then declared the property “allodial,” offering certain protections from foreclosure due to unpaid taxes.
However, it wasn’t truly allodial:
- The state still retained ultimate authority.
- Zoning and building laws still applied.
- The term was mostly symbolic, not legal in the traditional sense.
This program ended in 2005, confirming that true allodial ownership remains a legal fiction in modern America.
Expert Opinions and Legal Interpretations
Most property experts agree that what is an allodial title represents a historical relic, not a modern legal instrument.
According to the Real Estate Law Review (2024):
“While the allodial title appeals to ideals of freedom, it conflicts with collective governance principles that underpin modern civil societies.”
From an expert’s viewpoint, pursuing allodial ownership today is more philosophical than practical.
Challenges to True Ownership
Even if allodial title existed, challenges would remain:
- Environmental laws: Restrict harmful land use.
- Eminent domain: Allows state acquisition for public use.
- Zoning codes: Govern building types and density.
- Inheritance taxes: Still apply during estate transfers.
Thus, total land autonomy is theoretically appealing but practically impossible.
Ethical and Societal Balance
Property rights serve both individuals and society. Allodial title, while symbolizing ultimate freedom, could lead to fragmented regulation, making infrastructure and community planning impossible.
As legal historian Dr. Elaine Porter notes:
“The balance between individual ownership and societal control defines the stability of modern property systems.”
Hence, today’s property laws aim for secure ownership rather than absolute isolation.
Conclusion:
So, what is an allodial title in today’s world? It’s a historical concept of absolute land ownership that no longer functions within modern governments. While it symbolizes total independence, true allodial ownership doesn’t legally exist in the U.S. or most countries.
Modern property laws favor fee-simple ownership, balancing private rights with public responsibility. It may not grant total sovereignty, but it provides the stability, protection, and structure needed in contemporary society.
Ultimately, understanding what is an allodial title helps property owners appreciate both the freedoms they enjoy and the responsibilities that come with living under a shared legal framework.
FAQ’s
1. What makes allodial title different from fee-simple ownership?
Allodial title means absolute ownership without any superior authority. Fee-simple allows ownership but still recognizes government rights like taxation and eminent domain.
2. Can you buy an allodial title in the U.S.?
No. Despite some online claims, true allodial titles cannot be bought or created under U.S. law.
3. Why do people seek allodial titles?
Mostly due to the appeal of tax-free ownership and independence. However, such claims are legally invalid and often misunderstood.
4. Are there any countries where individuals hold allodial land today?
A few small regions in Europe and the Pacific still recognize ancestral allodial lands, but even there, national laws impose limits.
5. What is the closest thing to an allodial title today?
Fee-simple ownership is the closest modern equivalent, granting strong property rights but under lawful authority.
6. Is it worth pursuing an allodial title claim?
No. Since no modern government recognizes private allodial ownership, efforts to claim it are usually wasted or legally risky.

 Cartoon6 months ago
Unlocking the Potential of Nekopoi.care: A Comprehensive Guide
- Game2 years ago
Exploring Aopickleballthietke.com: Your Ultimate Pickleball Destination
- BUSINESS2 years ago
Unraveling the Mystery of 405 Howard Street San Francisco charge on Credit Card
- BUSINESS6 months ago
What Companies Are In The Consumer Services Field
- HOME IMPROVEMENT2 years ago
Vtrahe vs. Other Platforms: Which One Reigns Supreme?
- HEALTH2 years ago
Wegovy: Important Information and Prescription Instructions
- ENTERTAINMENT1 year ago
Understanding Bunkr Album: A Comprehensive Guide
- ENTERTAINMENT2 years ago
The Ultimate Guide to MP3Juices: Free Music Download